
How to maintain focusing lenses for laser cutting?
Time : 2025-07-21
Focusing lenses are core components in laser cutting systems, responsible for converging the laser beam into a high-energy density spot to achieve precise material cutting. Their performance directly affects cutting accuracy, edge quality, and equipment lifespan. Poor maintenance can lead to lens contamination, scratches, or coating damage, resulting in reduced laser energy utilization, increased cutting defects, and even costly replacements. Below, we will detail maintenance methods for focusing lenses, combining product characteristics and the latest FDA guidelines to ensure both operational safety and optimal performance.
1. Daily Inspection: The First Line of Defense
Daily inspection is the foundation of lens maintenance, as early detection of minor issues can prevent further damage.
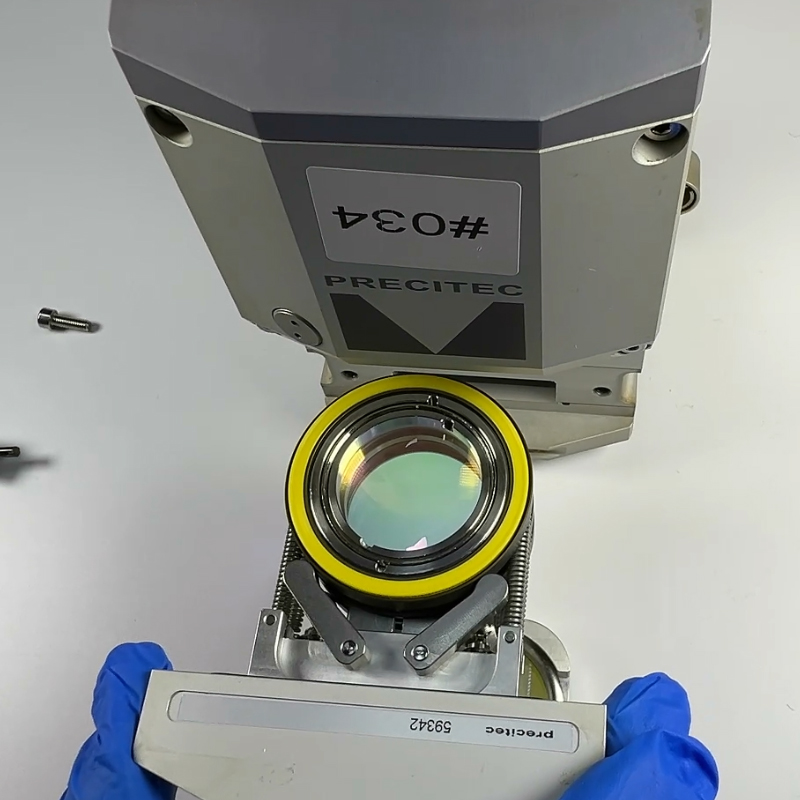
1.1 Visual Inspection
Before starting the laser cutting machine each day, power off the equipment and remove the lens housing (follow the specific steps in your product manual, as different models may vary). Use a flashlight to illuminate the lens surface at a 45° angle and check for the following:
- Contamination: Dust, oil stains, or metal splatters are common contaminants. Even tiny metal particles from cutting can adhere to the lens surface; over time, they absorb laser energy and cause local overheating, leading to lens ablation.
- Scratches or cracks: Small scratches may seem insignificant, but they can scatter the laser beam, reducing cutting precision. Cracks, even micro ones, can rapidly expand under laser energy impact, rendering the lens useless.
- Coating damage: Many focusing lenses (like those with anti-reflective coatings mentioned in product specifications) have a thin coating to reduce light reflection. Check for peeling, discoloration, or fogging of the coating, which indicates degradation.
1.2 Functional Inspection
After visual inspection, perform a short test cut on a scrap material (e.g., a small piece of the same metal or plastic you usually cut). Observe:
- Cutting edge: Rough edges, burrs, or unevenness may signal lens issues. A well-maintained lens produces smooth, consistent edges.
- Cutting speed: A sudden need to reduce speed to achieve clean cuts may indicate the lens is not focusing properly due to contamination or wear.
2. Cleaning: Precise Operation to Avoid Damage
Cleaning is critical, but improper methods can cause more harm than good. Follow these steps, considering both product sensitivity (e.g., fragile coatings) and FDA guidelines for equipment hygiene (especially in industries like medical device manufacturing).
2.1 Preparation
- Tools: Use lint-free lens wipes (preferably non-abrasive, as recommended for high-precision lenses), medical-grade isopropyl alcohol (99% purity, to avoid residue), and a rubber bulb syringe (to blow off loose dust). Avoid cotton swabs or tissues, as they may leave fibers or scratch the surface.
- Environment: Clean in a dust-free area (e.g., a workbench with a HEPA filter if available). FDA guidelines emphasize reducing particulate contamination in critical manufacturing environments, so minimizing dust during cleaning is essential.
2.2 Step-by-Step Cleaning
- Remove loose dust: Gently blow off surface dust with the rubber bulb syringe. Never wipe dry dust—abrasive particles can scratch the lens.
- Apply cleaning solution: Moisten a lens wipe with a few drops of isopropyl alcohol (do not soak). For lenses with special coatings (e.g., anti-reflective layers in your product line), ensure the solvent is compatible (check the product manual).
- Wipe in a circular motion: Start from the center of the lens and wipe outward in a gentle, consistent circular motion. Avoid back-and-forth wiping, which can trap debris and cause scratches.
- Dry naturally: Let the lens air-dry completely before reinstalling. Do not use compressed air (may contain oil or moisture) unless it’s filtered and approved for lens cleaning.
3. Storage: Protect Lenses When Not in Use
When removing lenses for replacement or maintenance, proper storage prevents damage:
- Use dedicated cases: Store lenses in their original protective cases, which are typically lined with soft, anti-static foam to avoid scratches and static attraction of dust.
- Control environment: Keep storage areas dry (relative humidity <60%) and at room temperature. Extreme temperatures or moisture can cause lens warping or coating degradation, as noted in product durability specifications.
- Avoid stacking: Never stack lenses or place heavy objects on them, as this can lead to cracks or edge chipping.
4. Handling and Installation: Prevent Damage During Operation
Even well-maintained lenses can be damaged during handling or installation:
- Wear clean gloves: Oils from fingers can transfer to the lens surface, attracting dust and absorbing laser energy. FDA guidelines for medical device production require strict hand hygiene to avoid contamination, which applies here too.
- Align correctly: When reinstalling, ensure the lens is properly seated in its housing. Misalignment can cause uneven laser focus, increasing energy concentration on specific areas of the lens and accelerating wear. Follow your product’s alignment markers or calibration steps.
- Avoid over-tightening: Over-tightening the lens housing can warp the lens or damage its edges. Use the recommended torque settings (if specified in the manual).
5. Compliance with FDA Guidelines
For users in industries regulated by the FDA (e.g., medical device manufacturing, where laser cutting is used for precision parts), lens maintenance is part of quality control:
- Document maintenance records: Log inspection dates, cleaning steps, and any issues found. FDA audits require traceability of equipment maintenance to ensure product consistency.
- Use approved materials: Ensure cleaning solvents (like isopropyl alcohol) are FDA-approved for use in manufacturing environments to avoid chemical residues that could contaminate products.
- Validate performance post-maintenance: After cleaning or replacing lenses, perform test cuts on calibration materials and record results. This ensures the lens meets performance standards required for FDA-regulated products.
6. Common Questions and Answers
Q1: How often should I clean the focusing lens?
A1: It depends on usage frequency and material type. For daily heavy use (8+ hours) cutting metals (which produce more splatters), clean the lens every 2–3 days. For cutting plastics or lighter use, weekly cleaning may suffice. If you notice reduced cutting quality (e.g., rough edges), clean immediately.
Q2: Can I reuse lens wipes or cleaning cloths?
A2: No. Reusing wipes can transfer trapped debris back to the lens, causing scratches. Always use a new, clean wipe for each cleaning session.
Q3: My lens has a small scratch—can it still be used?
A3: Minor scratches (less than 1mm and not in the center) may not severely affect performance, but monitor cutting quality closely. If you notice uneven cuts or increased energy loss, replace the lens. Deep scratches or cracks require immediate replacement, as they can cause lens failure during operation.